GPU: From Physical Hardware to a VM to a Container
TL;DR
To let an application inside a container running on a VM use an NVIDIA GPU:
- Pass the host’s GPU through to the VM.
- Use NVIDIA’s container runtime to expose the GPU inside the container.
- Use a device plugin for scheduling in Kubernetes.
Passthrough in Proxmox VE
Configure the Host
Add IOMMU Parameters to GRUB
Edit the file:
$ vi /etc/default/grub
You should find this line:
GRUB_CMDLINE_LINUX_DEFAULT="quiet"
Add the Intel or AMD IOMMU parameter, depending on your CPU:
GRUB_CMDLINE_LINUX_DEFAULT="quiet amd_iommu=on"
# or
GRUB_CMDLINE_LINUX_DEFAULT="quiet intel_iommu=on"
After making the change, update GRUB:
$ update-grub
Add VFIO Modules
Edit the modules file:
$ vi /etc/modules
Add:
vfio
vfio_iommu_type1
vfio_pci
vfio_virqfd
Remap IOMMU Interrupts
Add options to allow unsafe IOMMU interrupts:
$ echo "options vfio_iommu_type1 allow_unsafe_interrupts=1" > /etc/modprobe.d/iommu_unsafe_interrupts.conf
$ echo "options kvm ignore_msrs=1" > /etc/modprobe.d/kvm.conf
Add a Driver Blacklist
Prevent the host from using the target device, leaving it available for the VM:
echo "blacklist radeon" >> /etc/modprobe.d/blacklist.conf
echo "blacklist nouveau" >> /etc/modprobe.d/blacklist.conf
echo "blacklist nvidia" >> /etc/modprobe.d/blacklist.conf
Add the GPU to VFIO
Use lspci to find the GPU you want to pass through—in my case, a GT 1030:
$ lspci
...
26:00.0 VGA compatible controller: NVIDIA Corporation GP108 [GeForce GT 1030] (rev a1)
26:00.1 Audio device: NVIDIA Corporation GP108 High Definition Audio Controller (rev a1)
...
Once you find it, look up its vendor/device IDs:
$ lspci -n -s 26:00
26:00.0 0300: 10de:1d01 (rev a1)
26:00.1 0403: 10de:0fb8 (rev a1)
Write the IDs into the VFIO configuration:
$ echo "options vfio-pci ids=10de:1d01,10de:0fb8 disable_vga=1"> /etc/modprobe.d/vfio.conf
Then update initramfs and reboot:
$ update-initramfs -u
$ reset
Configure the VM
Create a VM
Create the VM as usual, but do not start it yet.
Change the following settings:
- SCSI Controller: VirtIO SCSI Single
- Machine: q35
- BIOS: OMVF (UEFI)
Since the BIOS has been changed to UEFI, you also need to create an EFI disk.
Add the GPU
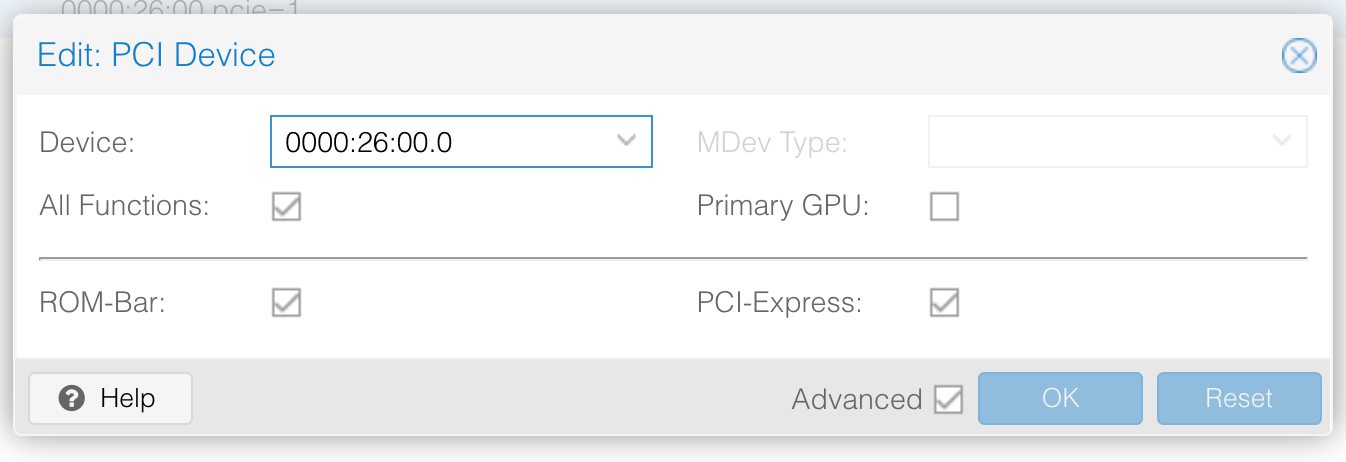
Add a PCI device, find the GPU, and add it:
Disable Secure Boot in the VM
For most Linux distributions, Secure Boot needs to be disabled to obtain access to the EFI disk. Otherwise, startup may fail with:
bdsdxe failed to load boot0001 EFI access denied
Press ESC while the VM is starting, open Device Manager, and clear the X next to Attempt Secure Boot.
Install and Test the Driver
After installing the VM’s OS, first check whether the GPU is visible inside the VM. If everything is working, the output should look much like the host’s, apart from the device numbering:
$ lspci
...
01:00.0 VGA compatible controller: NVIDIA Corporation GP108 [GeForce GT 1030] (rev a1)
01:00.1 Audio device: NVIDIA Corporation GP108 High Definition Audio Controller (rev a1)
...
Then download the Linux driver for the correct model and platform from NVIDIA’s website:
$ wget "https://us.download.nvidia.com/XFree86/Linux-x86_64/510.54/NVIDIA-Linux-x86_64-510.54.run"
First install the libraries needed to build it. I am using Ubuntu Server:
$ sudo apt install build-essential
Disable Linux’s open-source Nouveau kernel driver:
$ sudo vi /etc/modprobe.d/blacklist-nouveau.conf
Add:
blacklist nouveau
options nouveau modeset=0
Regenerate initramfs and reboot:
$ sudo update-initramfs -u
$ reboot
You can then install the official driver:
$ chmod +x NVIDIA-Linux-x86_64-510.54.run
$ sudo ./NVIDIA-Linux-x86_64-510.54.run
Once it is installed, use nvidia-smi to check the GPU’s status:
$ nvidia-smi
Wed Feb 16 03:10:00 2022
+-----------------------------------------------------------------------------+
| NVIDIA-SMI 510.54       Driver Version: 510.54       CUDA Version: 11.6     |
|-------------------------------+----------------------+----------------------+
| GPU  Name        Persistence-M| Bus-Id        Disp.A | Volatile Uncorr. ECC |
| Fan  Temp  Perf  Pwr:Usage/Cap|         Memory-Usage | GPU-Util  Compute M. |
|                               |                      |               MIG M. |
|===============================+======================+======================|
|   0  NVIDIA GeForce ...  Off  | 00000000:01:00.0 Off |                  N/A |
| 38%   33C    P0    N/A /  30W |      0MiB /  2048MiB |      0%      Default |
|                               |                      |                  N/A |
+-------------------------------+----------------------+----------------------+

+-----------------------------------------------------------------------------+
| Processes:                                                                  |
|  GPU   GI   CI        PID   Type   Process name                  GPU Memory |
|        ID   ID                                                   Usage      |
|=============================================================================|
|  No running processes found                                                 |
+-----------------------------------------------------------------------------+
Expose the GPU Inside a Container
Configure the Container Runtime
Install nvidia-docker and the runtime:
$ distribution=$(. /etc/os-release;echo $ID$VERSION_ID)
$ curl -s -L https://nvidia.github.io/nvidia-docker/gpgkey | sudo apt-key add -
$ curl -s -L https://nvidia.github.io/nvidia-docker/$distribution/nvidia-docker.list | sudo tee /etc/apt/sources.list.d/nvidia-docker.list
$ sudo apt update && sudo apt-get install -y nvidia-container-toolkit
$ sudo apt install nvidia-container-runtime
$ sudo apt-get update && sudo apt-get install -y nvidia-docker2
Update daemon.json, changing the default runtime to the newly installed nvidia-container-runtime:
$ sudo vi /etc/docker/daemon.json
Use the following configuration:
{
  "default-runtime": "nvidia",
  "runtimes": {
    "nvidia": {
      "path": "/usr/bin/nvidia-container-runtime",
      "runtimeArgs": []
    }
  }
}
Restart the Docker daemon:
$ sudo systemctl restart docker
Test Inside a Container
Run nvidia-smi using the nvidia/cuda image to check whether the container can access the GPU. The output should look much like it does inside the VM:
$ docker run --rm --gpus all nvidia/cuda:11.0-base nvidia-smi
Wed Feb 16 03:32:28 2022
+-----------------------------------------------------------------------------+
| NVIDIA-SMI 510.54       Driver Version: 510.54       CUDA Version: 11.6     |
|-------------------------------+----------------------+----------------------+
| GPU  Name        Persistence-M| Bus-Id        Disp.A | Volatile Uncorr. ECC |
| Fan  Temp  Perf  Pwr:Usage/Cap|         Memory-Usage | GPU-Util  Compute M. |
|                               |                      |               MIG M. |
|===============================+======================+======================|
|   0  NVIDIA GeForce ...  Off  | 00000000:01:00.0 Off |                  N/A |
| 38%   34C    P0    N/A /  30W |      0MiB /  2048MiB |      0%      Default |
|                               |                      |                  N/A |
+-------------------------------+----------------------+----------------------+

+-----------------------------------------------------------------------------+
| Processes:                                                                  |
|  GPU   GI   CI        PID   Type   Process name                  GPU Memory |
|        ID   ID                                                   Usage      |
|=============================================================================|
|  No running processes found                                                 |
+-----------------------------------------------------------------------------+
You can also run a TensorFlow model for a bit of stress testing:
$ docker run --rm -ti --gpus all tensorflow/tensorflow:latest-gpu
Using It in Kubernetes: Jellyfin as an Example
In Kubernetes, a pod needs a device plugin to access special hardware resources. First deploy NVIDIA’s device plugin:
$ kubectl create -f https://raw.githubusercontent.com/NVIDIA/k8s-device-plugin/master/nvidia-device-plugin.yml
Check that the resources have been deployed. Although only one of my nodes has a GPU, the DaemonSet does not check for that when deploying, so it runs on every node. You could modify the device plugin’s node selector so it runs only on the appropriate node, though I have not tested whether that causes any issues:
$ kubectl get daemonset -A
NAMESPACE        NAME                             DESIRED   CURRENT   READY   UP-TO-DATE   AVAILABLE   NODE SELECTOR              AGE
kube-system      nvidia-device-plugin-daemonset   4         4         4       4            4           <none>                     1m
...
Next, deploy Jellyfin and test GPU transcoding.
First, label the appropriate node so that the pod can be scheduled there:
$ kubectl label node mufti-4 nvidia.com/gpu=dedicated
Add node affinity to Jellyfin’s Deployment:
affinity:
  nodeAffinity:
    requiredDuringSchedulingIgnoredDuringExecution:
      nodeSelectorTerms:
      - matchExpressions:
	- key: nvidia.com/gpu
	  operator: In
	  values:
	  - dedicated
Many images also require additional environment variables to use the GPU. Jellyfin, for example, needs:
env:
- name: NVIDIA_DRIVER_CAPABILITIES
  value: "all"
- name: NVIDIA_VISIBLE_DEVICES
  value: "all"
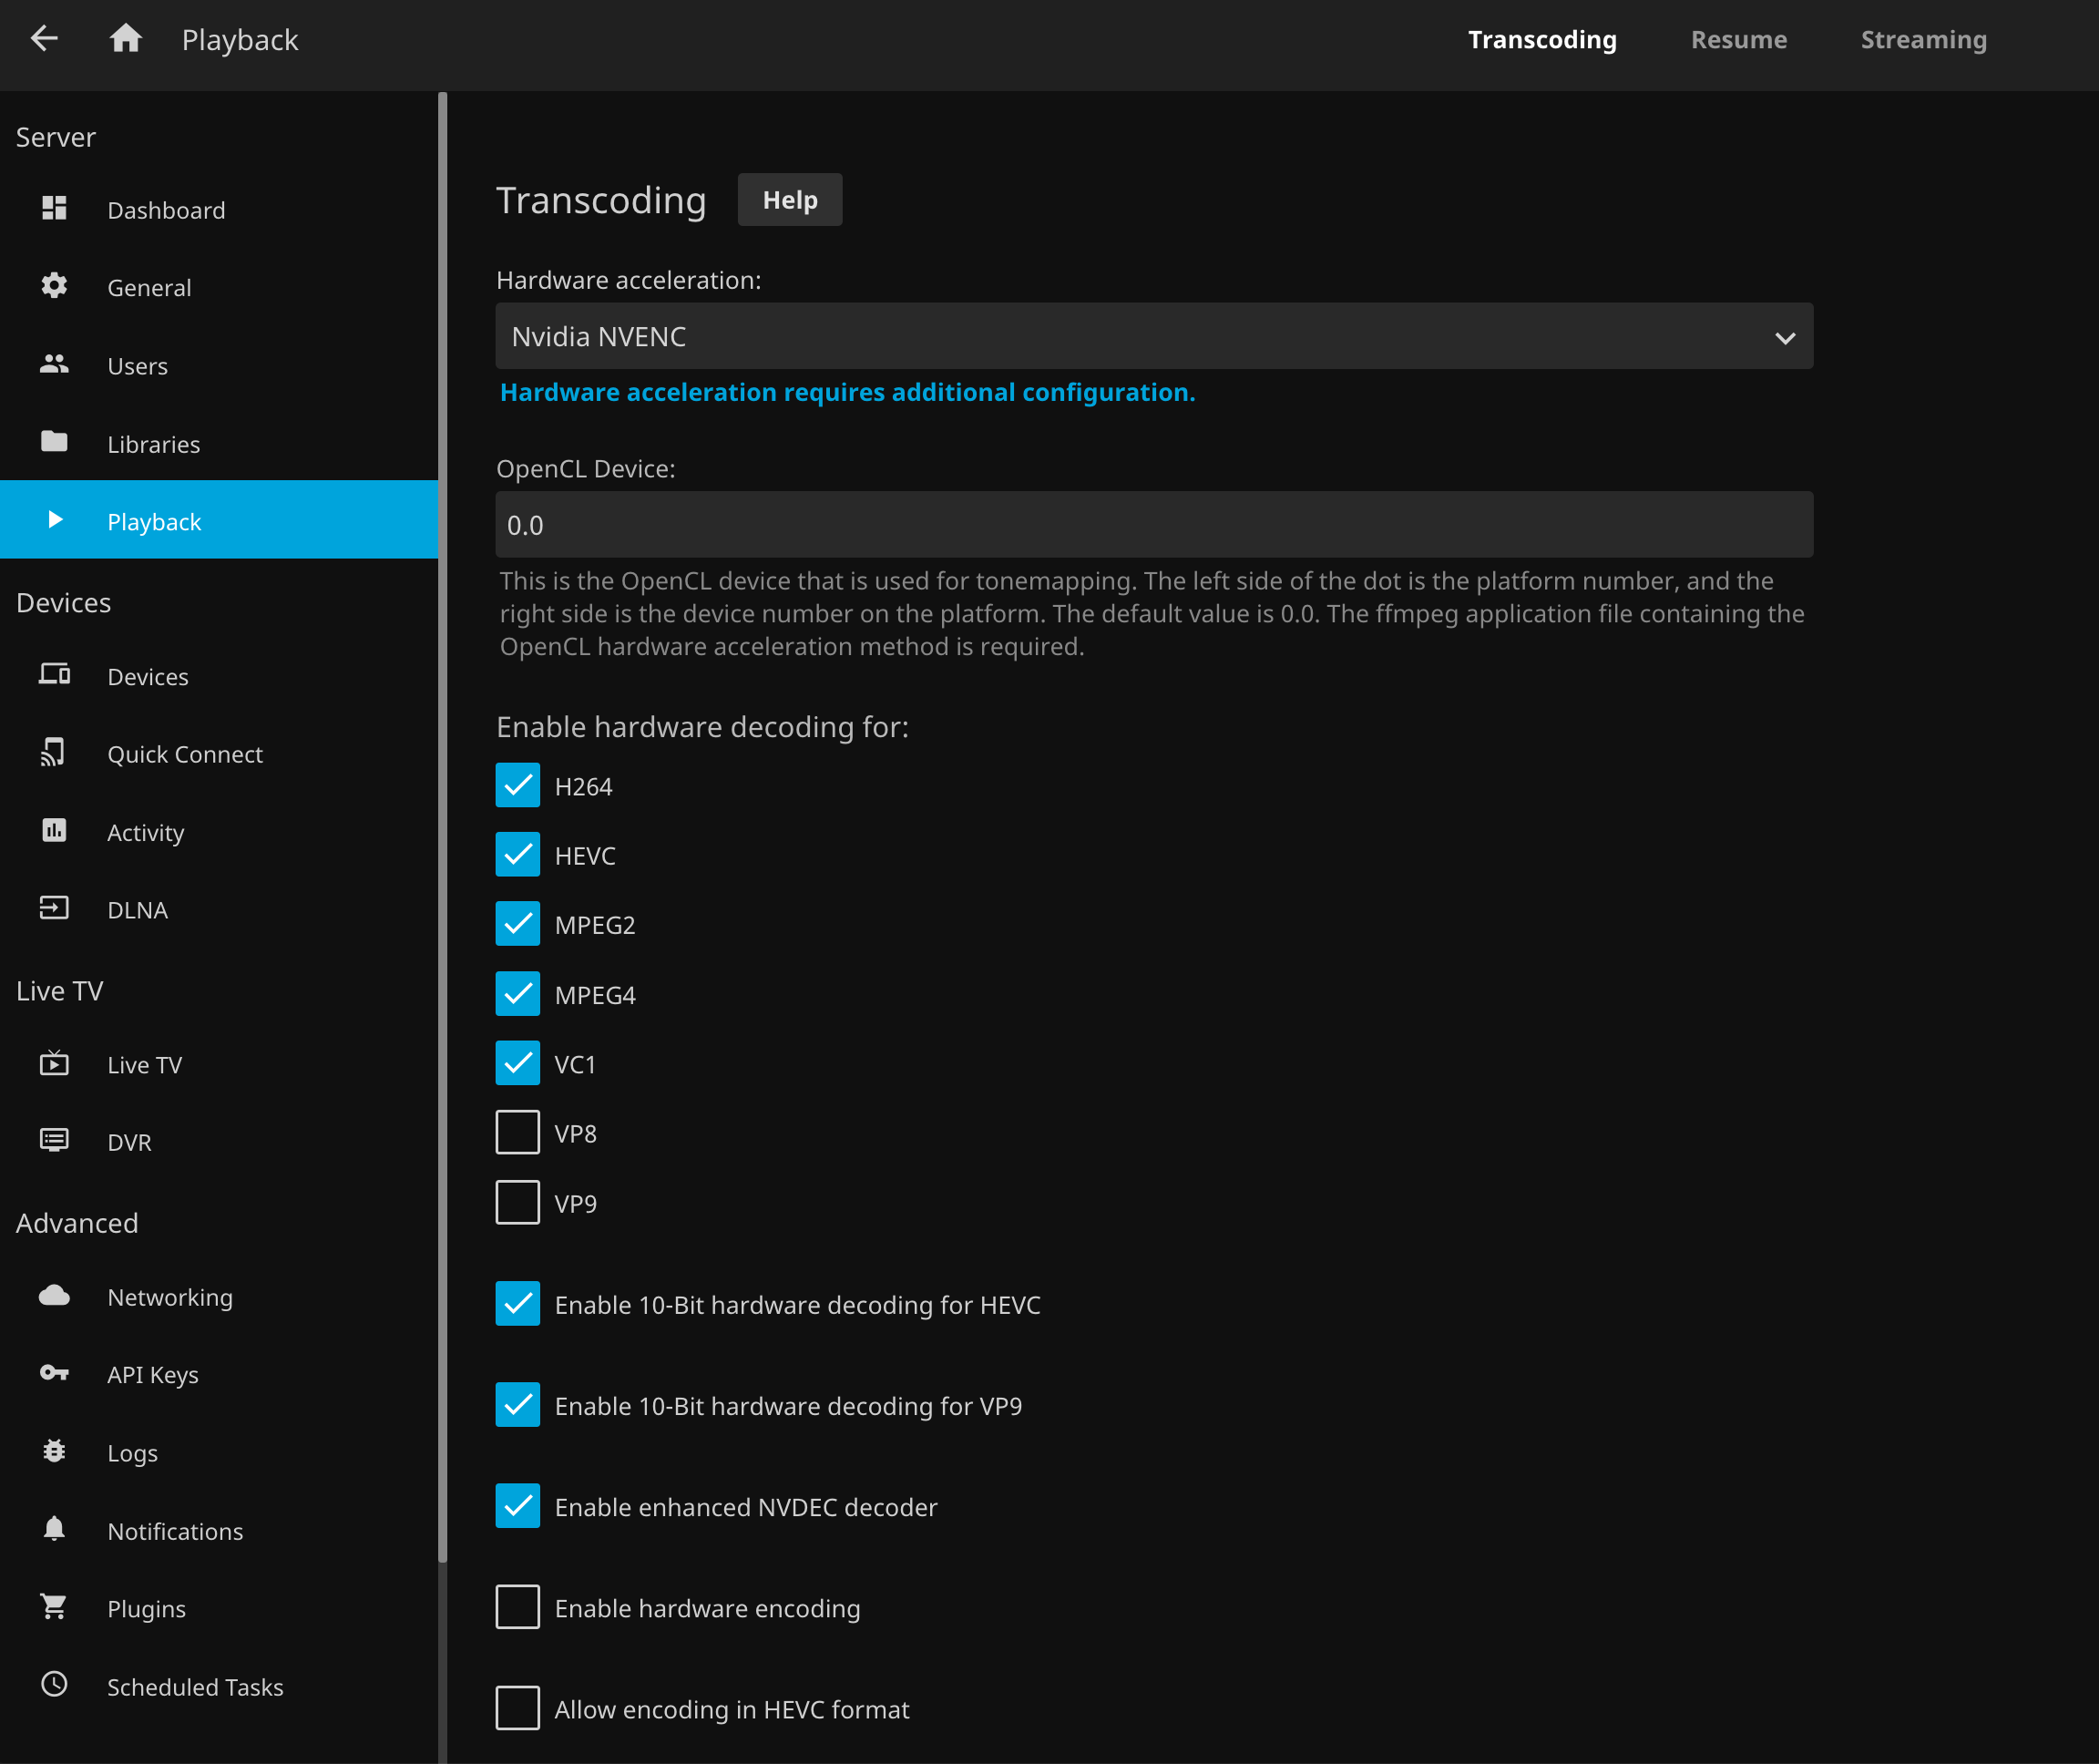
After deployment, enable Hardware acceleration in Jellyfin’s settings and select Nvidia NVENC. My GT 1030 is rather underpowered: for the common H.264 and H.265 4:2:0 formats, it supports decoding but not encoding, so I also have to explicitly disable the encoding options below. GPU transcoding support is listed in NVIDIA’s developer documentation.
While playing a video, check the load with nvidia-smi. We can see that the GPU is successfully being used:
$ nvidia-smi
Wed Feb 16 08:31:29 2022
+-----------------------------------------------------------------------------+
| NVIDIA-SMI 510.54       Driver Version: 510.54       CUDA Version: 11.6     |
|-------------------------------+----------------------+----------------------+
| GPU  Name        Persistence-M| Bus-Id        Disp.A | Volatile Uncorr. ECC |
| Fan  Temp  Perf  Pwr:Usage/Cap|         Memory-Usage | GPU-Util  Compute M. |
|                               |                      |               MIG M. |
|===============================+======================+======================|
|   0  NVIDIA GeForce ...  Off  | 00000000:01:00.0 Off |                  N/A |
| 35%   39C    P0    N/A /  30W |    951MiB /  2048MiB |     36%      Default |
|                               |                      |                  N/A |
+-------------------------------+----------------------+----------------------+

+-----------------------------------------------------------------------------+
| Processes:                                                                  |
|  GPU   GI   CI        PID   Type   Process name                  GPU Memory |
|        ID   ID                                                   Usage      |
|=============================================================================|
|    0   N/A  N/A      1719      C   ...ib/jellyfin-ffmpeg/ffmpeg      949MiB |
+-----------------------------------------------------------------------------+